EMA Breakout Entry Rules With Price Action
EMA breakout entry rules use price structure as the trigger, EMA alignment as confirmation, and the failed support or resistance zone as invalidation.

EMA breakout entry rules work best when price structure creates the trade and the moving averages only confirm its direction. Support or resistance must break with acceptance, price should remain on the correct side of both EMAs, and invalidation should sit beyond the failed zone.
That order matters. An EMA is calculated from historical prices, so it reacts after the underlying price behavior has changed. It can organize momentum, but it cannot replace the candles, swings, and reference zones that reveal what buyers and sellers are doing now.
Price action and indicators perform different jobs
Price action is the raw sequence of candles, swing highs, swing lows, support, and resistance. Reading it requires interpretation. A trader must decide whether price is accepting beyond a level, rejecting it, or merely testing it without commitment.
Indicators process historical price or volume through formulas. Moving averages smooth price into a trend filter. RSI and MACD organize momentum differently, but they share the same limitation: some degree of lag can occur because the calculation depends on completed or developing data.
That does not make indicators useless. It defines their proper role. Price action identifies the location and trigger. The EMA pair confirms whether short-term momentum agrees with the proposed direction. The clean hierarchy is structure first, confirmation second, and risk definition before execution.
A common mistake is reversing that hierarchy. Traders see a fast EMA cross a slow EMA and enter without checking whether price is breaking a meaningful zone. The result is often an entry in the middle of a range, directly into support or resistance, where the crossover carries little structural value.
EMA breakout entry rules begin with structure
The sequence is more important than the individual signal. First, mark a support or resistance zone from visible price behavior. Next, wait for price to break that zone with follow-through. Then confirm that price and the faster EMA are positioned on the correct side of the slower 21 EMA. Finally, define the level that proves the breakout has failed.
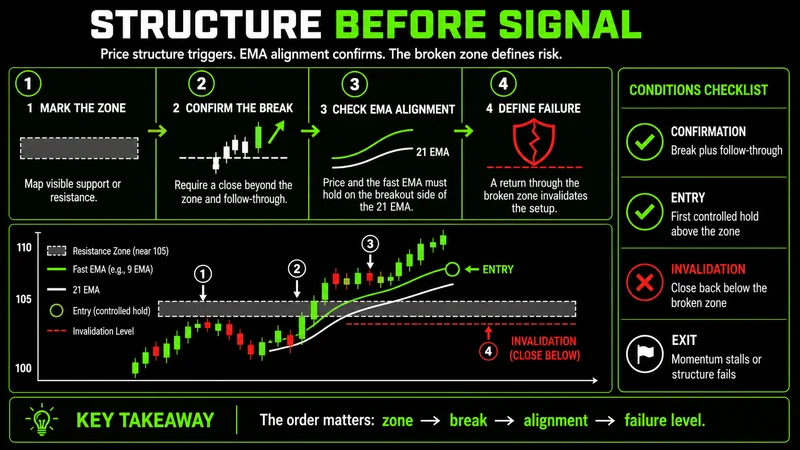 A valid EMA breakout begins with a meaningful zone and ends with defined invalidation.
For a long setup, price should trade above both selected EMAs after resistance breaks. The faster 9 or 13 EMA should generally remain above the 21 EMA, showing that near-term momentum is aligned with the broader filter. For a short setup, price should trade below both EMAs after support breaks, while the faster EMA stays below the 21 EMA.
A brief move through a zone is not enough. Follow-through matters because it shows that price can hold outside the prior area. A retest can provide additional confirmation, but it is not mandatory. What matters is whether the broken zone changes its role and whether price maintains acceptance on the breakout side.
This framework does not predict the breakout. It waits for evidence, then defines a conditional trade around that evidence. If price loses the required structure, the trade idea is wrong regardless of how attractive the EMA alignment still looks.
The 9/21 and 13/21 EMA pairs serve similar roles
Both combinations use the 21 EMA as the slower trend filter. The difference is the sensitivity of the faster average. A 9 EMA responds more quickly to recent price movement, while a 13 EMA smooths more of the short-term variation.
The 9/21 pair can highlight momentum changes sooner. That sensitivity may help during a clean, fast expansion, but it can also create more frequent changes when price becomes choppy. The 13/21 pair reacts more slowly and may filter some minor fluctuations, though the confirmation can arrive later.
Neither pair is automatically superior. The choice should remain consistent enough to evaluate. Switching from 9/21 to 13/21 after a losing trade changes the rules without addressing whether the original trade had valid structure, follow-through, and risk.
The pair is a filter, not the setup itself. If price is above both EMAs but sitting directly beneath established resistance, there is no confirmed long breakout. If price is below both while testing major support, there is no confirmed short breakout. Location still controls the decision.
Long and short entries require mirrored confirmation
Consider a long example. Price has tested a resistance zone several times, creating a clear reference area. It closes above that zone, the next candles hold above it, and both the faster EMA and the 21 EMA remain beneath price. An entry may follow the breakout or a successful retest. The invalidation belongs below the failed resistance zone, which should now act as support.
Now reverse the logic for a short. Price breaks a defined support zone and continues lower. It trades below the fast EMA and the 21 EMA, with the fast EMA under the slow EMA. A failed retest of the broken support can provide the entry. The stop belongs above the failed zone or a recent swing high that would negate the bearish structure.
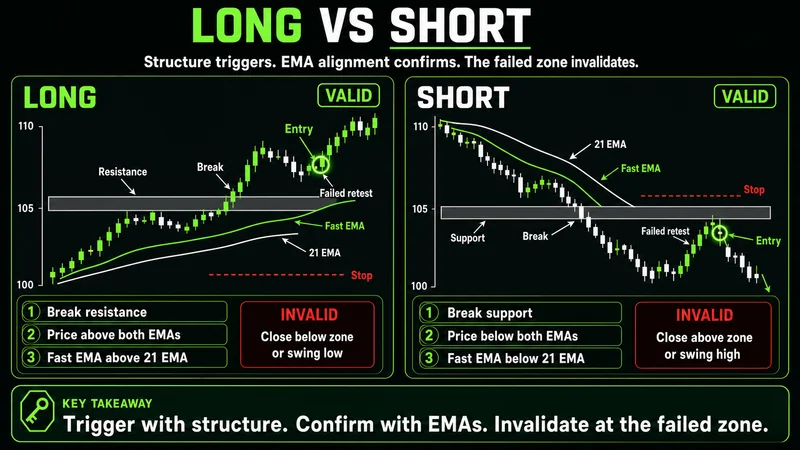 Long and short EMA breakout entries use mirrored structure, momentum, and stop placement.
The two examples are symmetrical in logic, but live execution rarely looks perfectly balanced. Candle size, volatility, and distance from the invalidation point affect whether the entry is practical. A structurally valid setup can still offer poor risk if the breakout candle is extended and the stop must sit too far away.
Chasing that extension is a common mistake. The EMA alignment may look clean because the move has already traveled a significant distance. Waiting for a controlled retest or skipping the trade protects execution quality. Confirmation does not require participation at any price.
Stop-loss placement should express defined invalidation
A stop should identify the point where the trade thesis no longer holds. For a long breakout, that usually means price falls back beneath the broken resistance zone and accepts there. For a short breakout, it means price reclaims the broken support zone or moves above the relevant swing high.
This is different from placing a stop at an arbitrary distance. The structural level comes first. Position exposure can then be adjusted to fit that distance. Moving the stop closer simply to increase size often places it inside ordinary price movement, where the setup has not actually failed.
The invalidation must also be evaluated after entry. A quick reclaim of broken support is a direct warning against a short. A fast loss of the former resistance zone weakens a long. The EMAs may remain aligned for several candles because they lag, but current price behavior has priority.
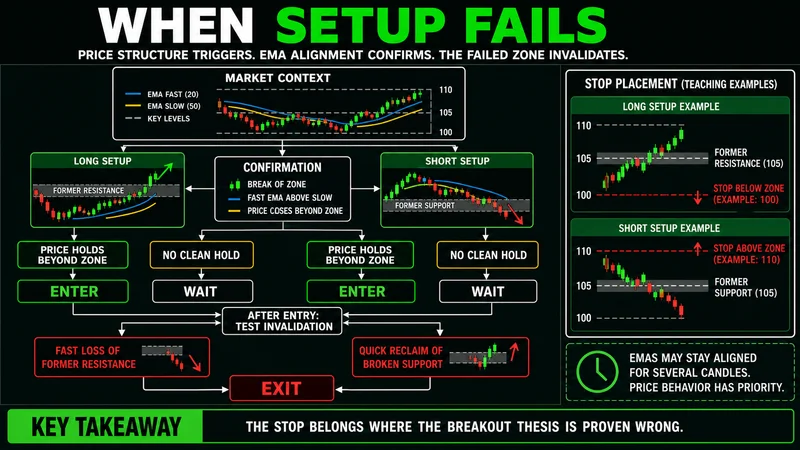 Current price behavior overrides lagging EMA alignment when a broken zone is reclaimed.
A disciplined response is simple: accept the invalidation rather than asking the indicator to overrule it. The moving averages confirmed momentum at entry. They do not justify holding after the structural premise disappears.
When EMA breakout confirmation does not work
EMA confirmation loses value in sideways, low-quality conditions where price repeatedly crosses both averages. In that environment, the fast and slow EMAs compress, reverse order, and produce signals without sustained displacement. Support and resistance breaks are also more likely to fail when there is no acceptance beyond the range.
The framework can also break down during abrupt volatility expansion. Price may travel through a zone and both EMAs before the averages can represent the new condition. A technically aligned entry taken after that expansion may carry excessive distance to a valid stop. The setup is structurally late even if every indicator condition appears true.
Thin participation creates another problem. A breakout can print beyond a level without demonstrating reliable acceptance. If follow-through disappears immediately, treating the first candle as confirmation exposes the trade to a fast reversal.
These are conditions to avoid, not problems to solve with additional indicators. More calculations do not repair unclear structure. When the averages are tangled, the zone is poorly defined, or the invalidation distance is impractical, staying out preserves capital and keeps the rules intact.
Apply the framework as a repeatable checklist
Before considering an entry, identify a zone that price has respected clearly enough to matter. Decide in advance what constitutes a true break, what EMA alignment is required, and where the structural invalidation belongs.
Then assess the setup in order:
- Mark support or resistance from candles and swings.
- Wait for a break with visible follow-through or a controlled retest.
- Confirm price is above both EMAs for a long or below both for a short.
- Confirm the faster 9 or 13 EMA is aligned against the 21 EMA in the trade direction.
- Place invalidation beyond the failed zone or relevant swing.
- Reduce exposure or skip the trade if the stop distance is impractical.
- Exit when price reclaims the zone and invalidates the premise.
Testing should preserve one rule set at a time. Record whether the entry followed a direct breakout or retest, which EMA pair was used, where the invalidation sat, and whether market conditions were trending or ranging. That separates a problem with the framework from a problem with execution.
The central principle stays controlled: price action creates the opportunity, EMA alignment filters it, and the failed zone defines the risk. When those three elements disagree, there is no complete setup. Waiting is part of the decision.
Worth the read?