Intraday Gap Fill Setup With Entry and Invalidation
An intraday gap fill setup with entry and invalidation built around reversal confirmation, the gap origin, and risk-defined execution.
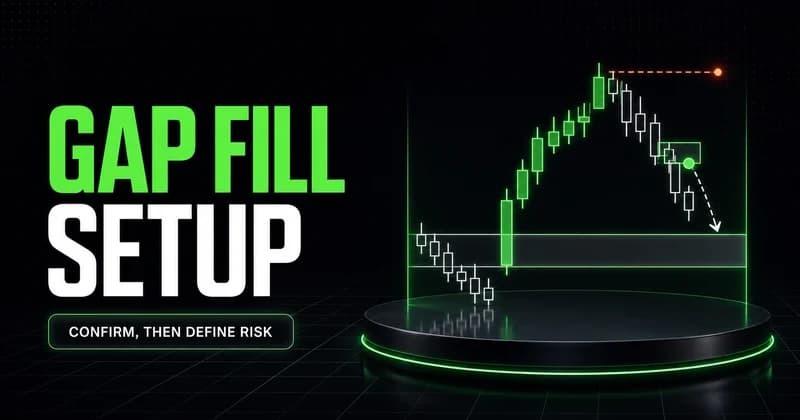
An intraday gap fill setup with entry and invalidation is a price-action trade that waits for reversal confirmation inside an unfilled gap, enters only after momentum turns, and targets the gap origin. The gap creates the location. Confirmation creates the entry. Invalidation defines where the idea is wrong.
A gap is not a promise. It is an area where price may rebalance if the current move loses acceptance. Mark the gap, observe price behavior, and act only after rejection becomes visible.
The intraday gap fill setup with entry and invalidation
A valid gap-fill trade starts with a clear gap origin and an unfilled gap zone. Price must move into that zone, stall, and produce reversal confirmation before an entry is considered. For a bearish fill, the stop belongs above the reversal high. The target is the gap origin. A bullish version uses the same logic in reverse.
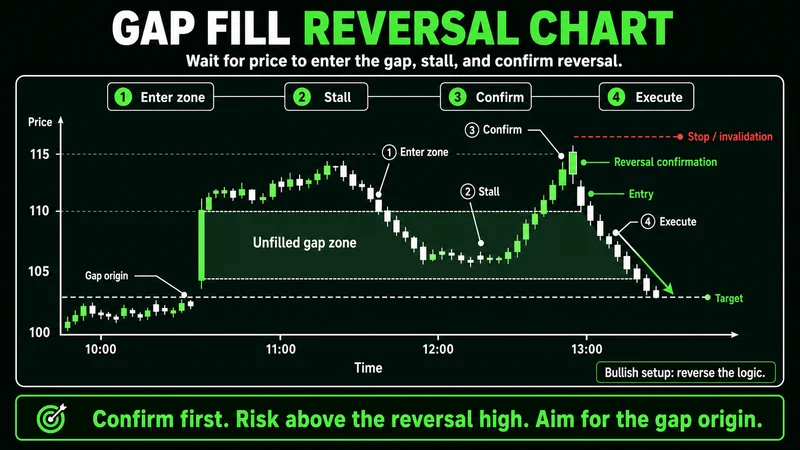 The entry follows reversal confirmation inside the gap zone, with invalidation beyond the rejection high.
The sequence is strict. Location comes first. Confirmation comes second. Execution comes third. Entering early turns a structured setup into a prediction.
For a bearish example, assume price opens at $102 after closing near $100. Price pushes higher, then prints a rejection candle near $103. A subsequent candle closes below that candle’s low. That close provides confirmation, an entry can be planned below it, and the rejection high becomes invalidation. The gap origin near $100 is the target.
The trade remains valid only while price stays below the rejection high and accepts lower prices. If price reclaims the high and holds, the reversal thesis has failed even if the gap remains open.
Confirmation must appear before the entry
Confirmation can take three forms: a strong candle close, a retest that holds, or volume expansion aligned with the expected move. Each shows that price has started moving away from the decision area instead of merely pausing.
A strong close demonstrates displacement. A retest shows whether the rejected level has changed role. Volume expansion can reveal increased participation. Context still matters. A large candle closing directly into nearby support offers limited information.
Before entry, verify the location, rejection, close, retest behavior, and invalidation level as one sequence. If one piece is missing, the chart may still look attractive, but the execution is no longer risk-defined.
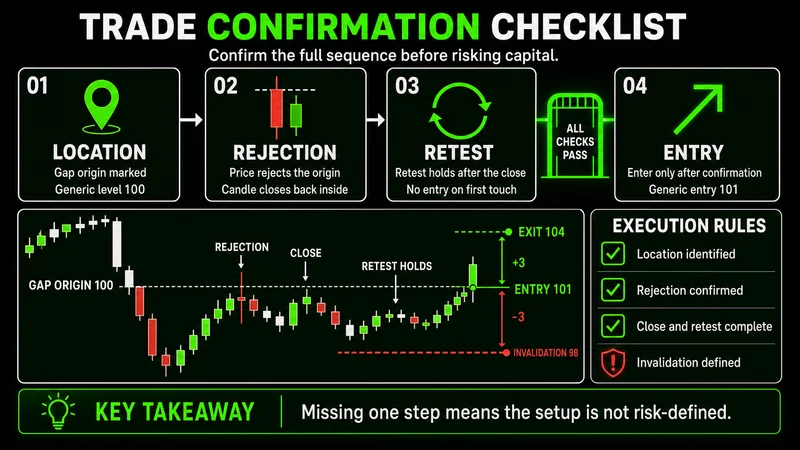 Location, rejection, close, retest behavior, and invalidation form one confirmation sequence.
MRPNL execution principle: Confirmation defines the trade; invalidation defines the risk.
The common mistake is treating any wick as rejection. A wick proves only that price visited an area and moved away before the close. The next close, retest, and available space before the target determine whether it matters.
Invalidation must be structural, not emotional
A stop should sit beyond the price behavior that made the setup valid. In a reversal, that usually means beyond the rejection wick. In a breakout, invalidation is a move back inside the broken range. In a pullback, it is acceptance beyond the trendline or swing structure that supported the entry. For a moving-average retest, it is failure to hold the crossed average and the associated swing.
This creates a defined answer to a difficult question: what would prove the trade wrong? If the answer is only “a loss large enough to make me uncomfortable,” position size is controlling the decision. Structure should define the stop first. Size should then be adjusted to fit that distance.
Moving a stop farther away after entry breaks that sequence. The original thesis was based on a specific rejection or level. Once price accepts beyond it, additional room does not improve the analysis. It only increases exposure to an invalid idea.
Breakouts, reversals, pullbacks, and moving averages need different proof
The four intraday setups share a confirmation requirement, but they do not use the same trigger.
| Setup | Entry evidence | Defined invalidation |
|---|---|---|
| Breakout | Close beyond support or resistance, followed by a stable retest | Acceptance back inside the prior range |
| Reversal | Rejection from support or resistance, followed by a confirming close | Price beyond the rejection wick |
| Pullback | Return to a trend area that holds and resumes with trend | Acceptance beyond the trendline or supporting swing |
| Moving average | Price crosses an average, holds, and retests it | Failed retest or recross with lost swing structure |
A breakout entry belongs on the retest of the broken level, not in the middle of the expansion candle. A reversal entry belongs after rejection, not because price merely touched support or resistance. A pullback requires an existing trend and a defended trend area. A moving-average trade needs price to cross and hold; contact with the average alone is not a signal.
These distinctions prevent setup drift. Traders often label a failed breakout as a reversal only after the first thesis stops working. That changes the name without changing the risk. Close the invalidated idea first. Any opposite setup must produce its own confirmation.
The 50 EMA and 200 EMA crossover needs price acceptance
A 50 EMA crossing above a 200 EMA is bullish crossover logic. A cross below is bearish crossover logic. The cross identifies a possible change in trend conditions, but the entry comes after the cross holds. A failed retest or a recross invalidates the setup.
The averages are slower than price. They help organize context but are weak as isolated triggers. If a crossover occurs after an extended move into resistance, the signal may arrive after the available reward has compressed. Market structure still takes priority.
A practical application is to combine the averages with support and resistance. A bullish cross has more meaning when price holds above the averages, retests support, and closes with renewed momentum. A bearish cross has more meaning when price stays below the averages, rejects resistance, and breaks a recent swing low. The average frames the trend; price behavior confirms execution.
Options strategy selection begins with market bias
Options express a market thesis; they do not repair a weak one. A bullish bias is stronger when price holds support or trends upward. The bullish choices shown include a long call, bull call spread, and bull put spread. A bearish bias is stronger when price rejects resistance or trends downward, with a long put, bear put spread, or bear call spread as possible structures.
A sideways market changes the decision. Range-bound conditions can favor neutral structures only when volatility assumptions fit. Short-premium structures carry substantial risk and require strict controls, while long straddles and strangles need enough movement to offset the premium paid. Directional spreads can cap both risk and reward compared with uncovered options.
The decision sequence should remain fixed: establish market bias, identify the entry trigger, mark the invalidation level, and check maximum risk before selecting a structure. If bias is undefined or invalidation cannot be stated, strategy selection is premature.
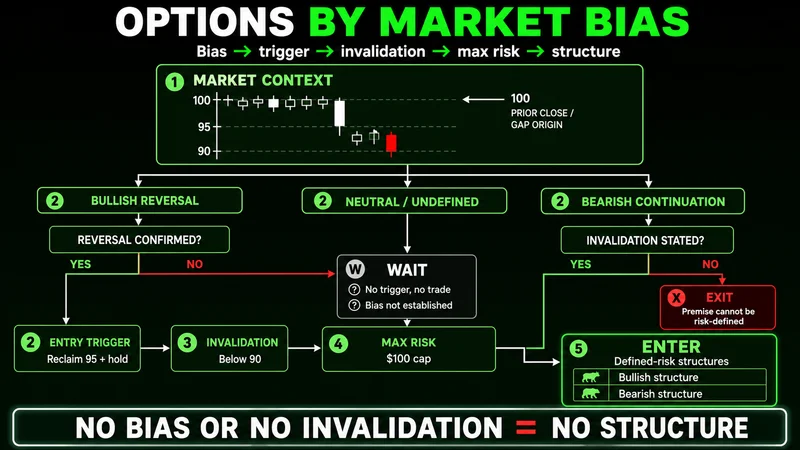 Price structure establishes bias before entry, invalidation, maximum risk, and options structure are selected.
The common mistake is choosing the option first because its payoff looks appealing. That reverses the process. Start with price structure and the condition that would make the thesis wrong. Then select a defined-risk structure matching the direction, expected movement, and acceptable exposure.
When this setup does not work
Gap-fill logic loses quality when fresh momentum keeps accepting away from the gap origin. A strong continuation move can leave the gap open while repeated reversal attempts fail. The framework also becomes unreliable when the gap boundary is unclear, the rejection candle is unusually wide, or the target offers too little space relative to structural invalidation.
Thin conditions create another problem. A wick may look like rejection when it only reflects poor participation. Without a decisive close or stable retest, the signal has little information behind it. The same caution applies around volatility shocks. Fast expansion can cross a level, reverse, and cross it again before structure has time to form.
This is the grounded failure condition: the setup does not work when price never confirms the reversal or when it reclaims the invalidation level with acceptance. Do not keep trading the same gap because the destination still appears logical. A reasonable target cannot rescue failed execution.
A practical execution routine keeps the setups separate
Use a repeatable routine before placing any trade:
- Mark support, resistance, the gap origin, relevant trendlines, and major moving averages.
- Classify the setup as a breakout, reversal, pullback, gap fill, or moving-average retest.
- Wait for a strong close, a stable retest, or aligned volume expansion.
- Define invalidation from the structure that supports the entry.
- Confirm that the target has sufficient room before opposing structure.
- Select position size or an options structure only after maximum risk is known.
- Exit when the invalidation condition occurs rather than renaming the failed setup.
The routine reduces impulsive entries because every setup must earn confirmation. It also keeps analysis honest. A breakout that falls back into its range is invalid. A reversal that trades beyond its wick is invalid. A pullback that loses its trend structure is invalid. A crossover that fails to hold is invalid.
The final takeaway is not that one setup is superior. It is that every setup needs a location, a trigger, and a defined failure point. Support, resistance, gaps, trendlines, and moving averages organize the chart. Price acceptance and rejection determine whether the trade is ready.
Worth the read?