Range Trading Strategy — Buy Support, Sell Resistance
A range trading strategy buys support and sells resistance in sideways markets. The real edge is knowing when the range holds and when it is about to fail.
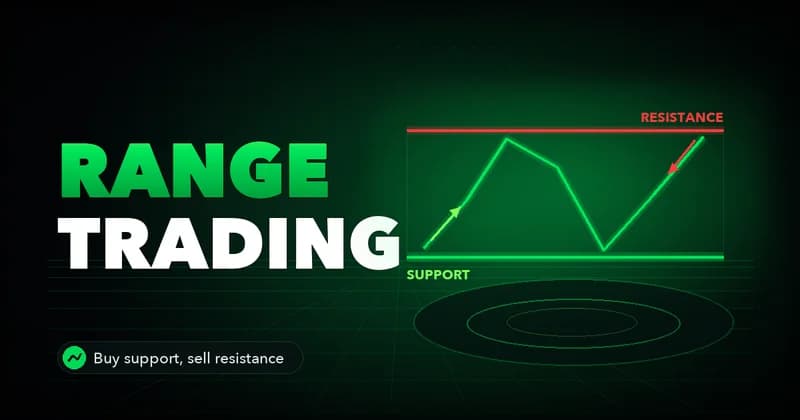
A range trading strategy buys near the bottom of a sideways market and sells near the top, working the same support and resistance levels until price stops respecting them. It is not a way to predict direction. It is a way to trade the absence of direction, which is where most markets spend the majority of their time. In a range-bound market the edge is not the entry at support. The edge is knowing when the range is real and when it is about to fail.
Most explanations stop at "buy support, sell resistance" and leave it there. That instruction is correct and almost useless on its own, because every losing range trade also bought support and sold resistance. The difference between a clean range trade and a slow account bleed is the part nobody puts on the chart: which touches are worth taking, which are noise, and what specifically tells you the range is finished. This guide covers the mechanics, then spends most of its time on the conditions that decide whether the mechanics work at all.
What a range trading strategy actually is
A range is a price zone bounded by a floor that buyers keep defending and a ceiling that sellers keep defending. When price reaches the floor, demand shows up and pushes it back. When price reaches the ceiling, supply shows up and pushes it down. Connect those reaction points and you have a horizontal channel. The structure comes down to three parts:
- Support: the floor where buyers have repeatedly stepped in and absorbed selling.
- Resistance: the ceiling where sellers have repeatedly capped the advance.
- The body: the space between them, where price has no level to lean on and the trade has no defined risk.
Range trading is the decision to treat that channel as the trade: long near support, short or flat near resistance, with risk defined just outside the level that would prove the structure wrong.
The logic is the mirror image of trend trading. A trend trader needs price to leave a level and keep going. A range trader needs price to reach a level and turn around. Both are reacting to structure, not predicting it. The market does not owe you a fourth bounce because it gave you three, so every range trade carries a defined invalidation: the point past the boundary where the range is no longer in control and you are simply wrong.
This is why range trading rewards patience over activity. The setups cluster at the edges and go quiet in the middle. A trader who needs constant action will manufacture trades in the dead center of the range, where there is no level to lean on and no defined risk. Most of the damage from trading inside a range comes from that habit, not from the boundaries themselves.
How to identify a trading range worth trading
Not every sideways chart is a tradable range. You are looking for a zone that price has tested on both sides at least twice, where the reactions are clear rather than marginal. Two clean touches of support and two clean touches of resistance give you a boundary you can actually trade against. One touch is a guess. Three or more touches that each produce a real rejection give you a structure with weight behind it.
A few conditions separate a tradable range from random chop:
- The boundaries are roughly horizontal, not drifting. A range that slopes hard is closer to a channel or an early trend.
- Each touch produces a visible reaction, not a quiet drift through the level. Acceptance through a boundary is the opposite of what you want to see.
- The range is wide enough to pay for the trade. A band only a few ticks tall cannot cover the spread plus a sensible stop, so the math is negative before you start.
- Volume tends to fall as price coils inside the range and pick up at the edges. That rhythm is part of what confirms the structure.
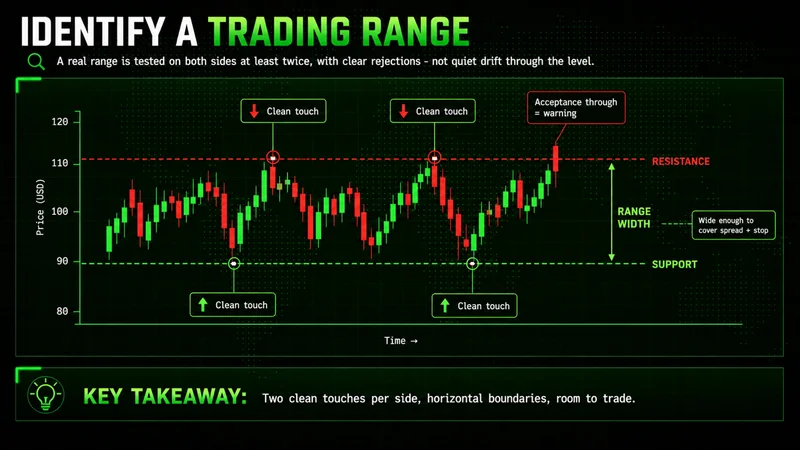
Width matters more than beginners expect. A range that is too tight relative to current volatility looks like a clean setup and behaves like a trap, because normal noise carries price through both boundaries without any real participant defending them. Measure the range height against the instrument's typical bar size. If a single average bar can travel most of the way across the range, there is no room to trade it with defined risk. Pass on it and wait for a structure that gives you space.
Buying support and selling resistance without chasing every touch
The instruction to buy support and sell resistance assumes every touch is equal. They are not. A touch where price stabs into the level, rejects fast, and closes back inside the range is a different event from a touch where price grinds into the level and sits there. The first shows defenders stepping in. The second shows the boundary weakening before it breaks. Trading both the same way is how a range strategy quietly turns into a losing one.
Wait for the reaction, not the arrival. Price reaching support is not the signal. Price reaching support and showing rejection is the signal: a fast wick back inside, a strong close off the low, a clear refusal to accept lower prices. That confirmation costs you a slightly worse entry and saves you from the touches that were never going to hold. Reactive beats predictive here. You are not catching the exact low. You are reacting to evidence that the low is being defended.
Risk sits just outside the boundary, never at it. If you buy the reaction off support, your invalidation is a decisive close below support, not a single wick that pokes through. Place the stop where the range thesis is actually broken and size the position so that being wrong costs a small, planned amount. The target is the opposite boundary, and many traders take partial profit before price reaches it, because the far edge is exactly where the next reversal risk lives. A mediocre entry with proper risk control survives a string of failed touches; a perfect entry with oversized risk does not survive the first one.
The disciplined sequence for trading a boundary stays the same every time:
- Wait for price to reach the level, then wait again for a visible rejection back inside the range.
- Enter on the confirmation, not the arrival, accepting a slightly worse price for far better odds.
- Set the stop a decisive close beyond the boundary, where the range thesis is genuinely broken.
- Target the opposite edge, and scale out before it rather than at it, since the far boundary is the next reversal zone.
The market rewards patience far more than activity. Inside a range that is doubly true, because the edges are the only place the structure gives you anything to lean on.
Range trading vs breakout trading — two sides of the same level
Range trading and breakout trading are not opposites. They are two responses to the same boundary, and which one is correct depends entirely on what price does at the level. The level is identical. The read is different:
- Range trade: fade the boundary, betting it holds, with the stop just outside it.
- Breakout trade: trade through the boundary, betting it gives way, with the stop back inside it.
- Shared signal: a decisive close and acceptance outside the level ends one trade and starts the other at the same instant.
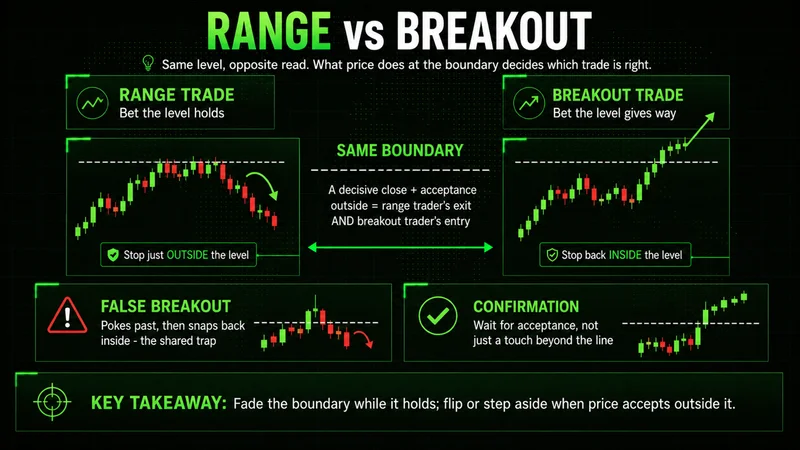
The practical problem is that you commit to the range read right up until the moment the range fails, and that failure often looks like one more touch until it does not. This is where the two strategies meet. A genuine range breakout — a decisive close and acceptance outside the boundary — is the range trader's invalidation and the breakout trader's entry signal at the same instant. Treating them as enemies is a mistake. The disciplined version is to range-trade the boundary while it holds and to step aside, or flip, when acceptance outside it confirms the structure has changed.
The trap most beginners fall into is the false breakout. Price pushes past the boundary, triggers stops, and snaps back inside the range. Range traders who panic and abandon a perfectly good level get shaken out at the worst point; breakout traders who chase the first poke get trapped. The way through both is the same word that runs through this entire approach: confirmation. Wait for acceptance, not just a touch beyond the line.
Where most range trading goes wrong
The strategy is simple, which is exactly why it is easy to execute badly. The common mistakes are not subtle, and almost all of them come from impatience rather than analysis.
- Trading the middle of the range. There is no level to lean on and no defined risk in the center, only the urge to be in a trade.
- Treating every touch as a signal. A boundary that is grinding rather than rejecting is warning you, not inviting you.
- Skipping the stop because "it always bounces." It bounces until the time it does not, and that one time pays for all the others if your risk is undefined.
- Trading a range that is too tight for the spread and volatility. The math is negative before the first trade.
- Refusing to recognize the breakout. The same trader who faded the edge five times correctly gives it all back by fading the sixth touch after price has already accepted outside the range.
Underneath all of these is a single error: trading the level without trading the context. A boundary in isolation means very little. The same support line that is worth defending in a calm, balanced market is worth nothing the moment a higher-timeframe trend or a volatility expansion runs through it. Entries only matter when they align with structure and conditions, not when they merely touch a line you drew earlier.
When the range stops being a range
Every range ends. The strategy works only while the structure holds, and the entire skill is recognizing the handful of conditions that void the playbook before they cost you.
A clean range read in balanced, mid-session conditions means almost nothing once volatility expands or a higher-timeframe trend takes over. The conditions that void a range are worth knowing cold:
- A decisive close outside a boundary with follow-through and acceptance, not an immediate snap back.
- A volatility expansion that carries price through both edges faster than any participant defends them.
- A higher-timeframe trend running straight through the level you were fading.
- A major data release or liquidity shift that rewrites the structure within minutes.
When any of these shows up, the right response is not to fade harder. It is to stand aside until a new structure forms, or to trade the breakout in the other direction with fresh risk. Adding size to defend a boundary the market has already left is how a manageable loss becomes an account problem.
Macro and event conditions deserve the same respect. A range built over quiet hours can be invalidated within minutes during a major data release or a liquidity shift, and the first move after that kind of catalyst is rarely the clean opportunity it appears to be. Gold will trade technically inside a range for hours and then void the entire structure in a single expansion when macro conditions shift. Index futures punish hesitation just as fast in the same situation. None of that is a flaw in the strategy. It is the strategy telling you it is the wrong tool for the moment, and the disciplined trader steps back rather than forcing a setup that the conditions no longer support.
No strategy works in all market conditions, and range trading is honest about its own boundaries: a range market is its home, and it loses its edge the moment the market stops being sideways. Knowing that is the difference between a range trader and someone using a range strategy in the wrong environment.
FAQs
What is a range trading strategy in simple terms? It is a method that buys near the bottom of a sideways price zone and sells near the top, working the same support and resistance boundaries while price keeps bouncing between them. The trade is the channel itself, with risk defined just outside the level that would prove the range wrong.
How do I identify a trading range? Look for a price zone tested on both sides at least twice, with clear rejections at each boundary rather than quiet drifts through them. The boundaries should be roughly horizontal, and the range should be wide enough to cover the spread plus a sensible stop. Two clean touches of support and two of resistance give you a structure worth trading.
How do I buy support and sell resistance correctly? Wait for the reaction at the level, not just the arrival. A fast rejection and a strong close back inside the range is the signal; price simply reaching the level is not. Set risk just beyond the boundary, target the opposite edge, and size the position so a failed touch costs a small, planned amount.
What is the difference between range trading and breakout trading? They are two reads of the same boundary. A range trader fades the level expecting it to hold; a breakout trader trades through it expecting it to give way. A decisive close and acceptance outside the boundary is the range trader's invalidation and the breakout trader's signal at the same moment.
When should I not trade inside a range? Skip the range when volatility expands, when a higher-timeframe trend is running through the level, when a major data release is near, or when the range is too tight to cover spread and risk. In each case the boundary stops being a place real participants defend, and fading it becomes a trap rather than a setup.
Is range trading good for beginners? The mechanics are simple, which makes it approachable, but the discipline it demands is not. It rewards patience, defined risk, and the willingness to skip low-quality touches and dead-center trades. Beginners who treat every touch as a signal and trade the middle of the range tend to learn the hard part the expensive way.
Range trading is a complete approach to one specific market condition, not a strategy for all conditions. It pairs naturally with an understanding of breakout trading, since both read the same levels from opposite sides, and with disciplined position sizing, since defined risk is what keeps a string of failed touches survivable. Treat the range as the trade, respect the conditions that void it, and let the dead center of the chart go untraded. The boundaries are where the structure gives you an edge. Everything between them is where range traders give it back.
Worth the read?