Risk Reward Trading Strategy — Why the Ratio Lies Alone
A risk reward trading strategy weighs your loss against your gain per trade, but the ratio only works once your win rate clears the line it sets.

A risk reward trading strategy decides how much you are willing to lose against how much you are trying to make on every trade, before you enter. It is the simplest discipline in trading and the most misread. Most traders treat a clean ratio as proof the trade is good. It is not. A 1:3 setup is still a losing strategy if your win rate cannot clear the line that ratio quietly draws under it.
That is the part the ratio hides. The number says nothing about whether the approach makes money until you pair it with how often you are actually right. Read alone, a risk reward ratio is half an equation, and the missing half is where most accounts leak.
What a risk reward trading strategy actually measures
A risk reward trading strategy measures the size of your planned loss against the size of your planned gain on a single position. The risk is the distance from your entry to your stop. The reward is the distance from your entry to your target. Express one against the other and you have the ratio: risk 1 to make 2 is 1:2, risk 1 to make 3 is 1:3.
The word "planned" matters. Both numbers are defined before the trade, not discovered after it. You decide where the idea is wrong and place the stop there, and where the move runs out of room and place the target there. The ratio falls out of those two structural decisions, which is why it belongs to risk management, not to entries. A defined invalidation and a realistic target are what make a position survivable. The entry only sets the clock running.
How to calculate the risk reward ratio on a real trade
Start with the three levels every trade needs: entry, stop, and target. Suppose you enter long at 100, set your stop at 90, and your target at 130. Risk is 10 points, reward is 30 points. Divide reward by risk and you get a 1:3 ratio.
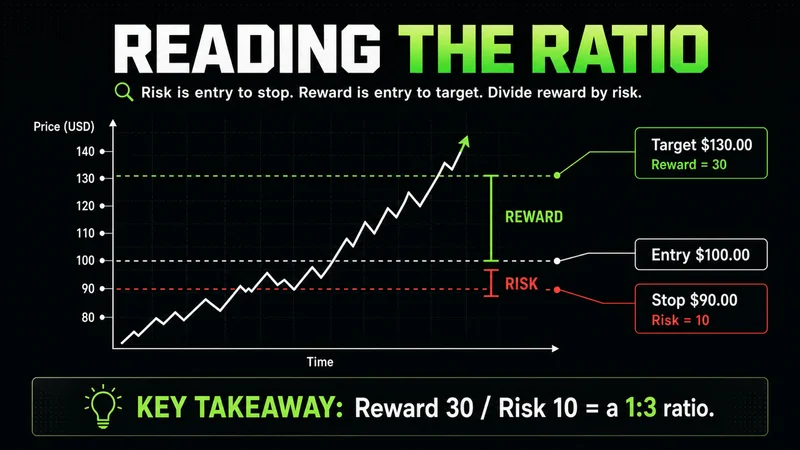
The mechanics stay the same on any instrument and any timeframe:
- Mark the entry where your setup triggers.
- Place the stop where the trade is structurally wrong, not at a round number that feels comfortable.
- Place the target where price is likely to stall, usually the next level of structure or liquidity.
- Divide the reward distance by the risk distance.
Notice what drives the result. The stop and target come from the chart; the ratio is the byproduct. Traders who reverse this order, picking a ratio first and forcing the stop and target to fit it, end up with stops where price runs them out and targets price never reaches.
What counts as a good risk reward ratio
There is no single good number, only one that fits the setup and your hit rate. Most discretionary traders work in a band. A 1:2 ratio is a common floor for momentum and breakout trades, because it stays profitable while winning roughly a third of the time. A 1:3 asks more of the setup but needs you right far less often.
Higher is not automatically better, and that is the trap behind chasing 1:5 or 1:10 setups. A wider target is one price reaches less often. You trade a higher reward for a lower fill rate, and past a point the trade simply stops happening. The right ratio is the one your structure can actually deliver, paired with a win rate that supports it.
The market rewards patience far more than activity. A trader rarely needs a wider ratio as much as they need fewer trades and tighter risk control.
The number most traders ignore: your breakeven win rate
Every risk reward ratio carries a hidden requirement: the minimum win rate you need just to break even. It is the most useful number in the whole framework, and the one most traders never calculate.
The math is direct. Each ratio sets the win rate you have to beat before the strategy makes a cent:
- 1:1 needs about half your trades to win.
- 1:2 needs about a third.
- 1:3 needs about a quarter.
- 1:5 needs roughly one in six.
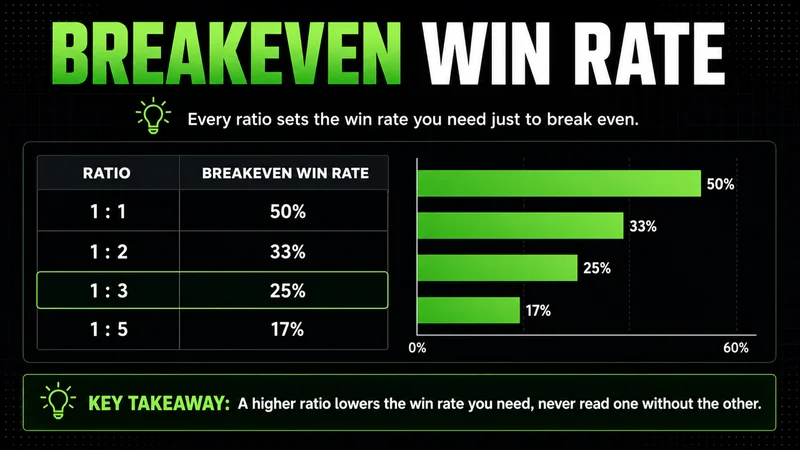
This is the second half of the equation the ratio hides. A 1:3 sounds strong until you see it demands a 25% win rate just to break even. If your actual hit rate is 20%, the 1:3 is a losing strategy dressed up as a disciplined one.
A ratio that looks fine on the chart can still be unprofitable in the account. The number sits there clean while the win rate quietly runs below the line that ratio requires.
Track your real win rate per setup and compare it against that breakeven line. Sit comfortably above it and the edge is real. Hover near it and the strategy is fragile, where one stretch of variance turns it red.
When forcing a fixed risk reward target works against you
A fixed target only works while price has room to travel that far. In a trending, momentum environment a 1:3 target fits, because price expands through levels and keeps going. The same 1:3 placed on a range or mean-reverting setup is where the framework inverts. In a range, price rarely covers three times your risk in one direction; it stalls and reverses near the middle, so a target that should have been a small win becomes a full stop-out.
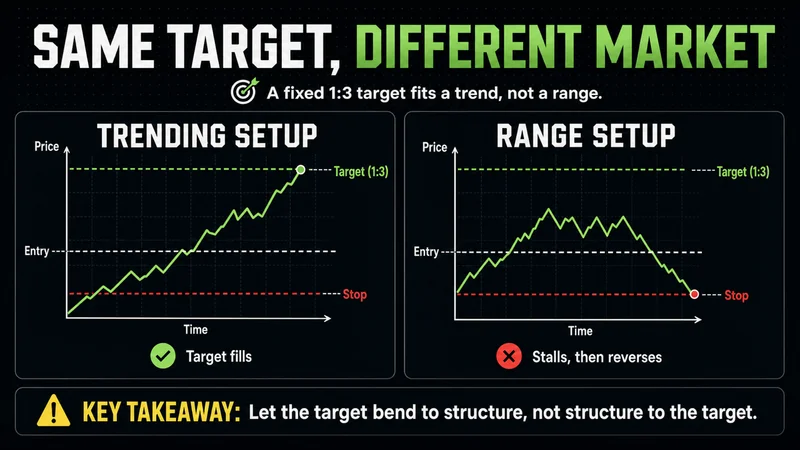
This is the cost of treating the ratio as a rule instead of a reading. Forcing a 1:3 onto compressed, two-sided conditions just guarantees you give back open profit waiting for a level price was never going to reach. The target has to bend to the structure in front of you, not the other way around.
It is also why no single ratio works across all conditions. In a clean trend you can demand more. In a range you take less, target the opposite side, and accept a 1:1 or 1:1.5 that actually fills. Adapting to the environment is the skill, and a rigid number is a comfort the market charges for.
Common risk reward mistakes that quietly drain accounts
Most damage here is not dramatic. It accumulates through small, repeated errors that look reasonable in the moment:
- Moving the stop wider mid-trade to avoid being stopped out, which silently wrecks the ratio you entered on.
- Taking profit early while letting losers run the full distance, so the realized ratio is far worse than the planned one.
- Judging the ratio without the win rate, and assuming a high number alone means a profitable strategy.
The thread through all of them is the same: the plan was sound and the execution drifted. A risk reward trading strategy is only worth what you hold yourself to, and the ratio means nothing once you start negotiating with it after the trade is live.
FAQs
What is a risk reward trading strategy in simple terms? It is a rule for sizing your planned loss against your planned gain before you enter. You define where the trade is wrong (the stop) and where it is likely to stall (the target), and the relationship between those two distances is your risk reward ratio.
What is a good risk reward ratio for trading? There is no universal number. Many discretionary traders use 1:2 as a working floor and 1:3 for higher-quality setups, but the right ratio is whatever your structure can realistically deliver paired with a win rate that clears its breakeven line.
How does the risk reward ratio affect my win rate? Each ratio sets a minimum win rate you must beat just to break even. A 1:2 needs about a third of trades to win, a 1:3 about a quarter, and a 1:5 roughly one in six. A higher ratio lowers the win rate you need, which is why the two are always read together.
Is a higher risk reward ratio always better? No. A wider target is reached less often, so pushing for 1:5 or 1:10 trades a higher reward for a lower fill rate. Past a point the setup stops happening, and a ratio your structure cannot deliver is worse than a smaller one that fills.
Where this fits in your process
A risk reward trading strategy is one input, not the whole system. It sits alongside position sizing, stop placement, and trade management, and only performs when those are disciplined too. Treat the ratio as a reading of the setup in front of you, pair it with the win rate it demands, and let both bend to market structure rather than forcing structure to fit a number. That is the difference between a ratio that protects capital and one that only looks good on the chart.
Worth the read?