Stop Loss and Take Profit Explained for Beginners
Stop loss and take profit explained for beginners — how to set both before you enter, why they protect capital, and when they fail.
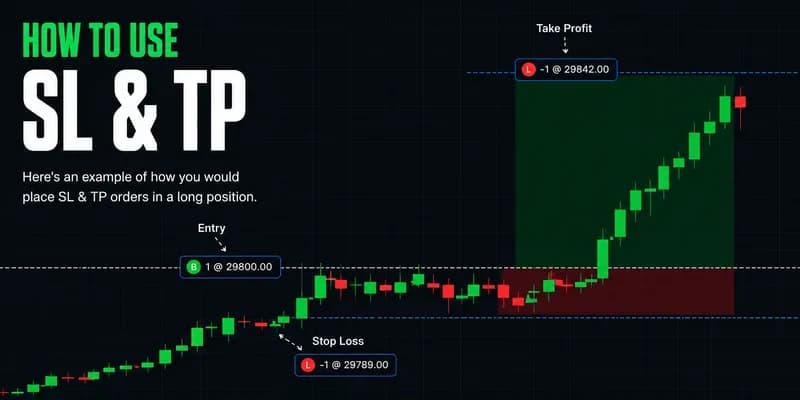
Stop loss and take profit explained for beginners come down to one rule: define where you are wrong and define where you are done before you click buy. A stop loss is the order that closes your trade automatically when the price hits a level that proves your idea wrong. A take profit is the order that closes it when the price reaches the level that pays you for being right. They are not optional. They are the structure that turns a trade from a guess into a decision.
Most beginner accounts do not fail because the entries were bad. They fail because the exits were never written down. Once a position is open, judgment deteriorates.
The four ideas that matter most in this guide:
The stop comes from the chart, not the account balance.
The take profit comes from the same structure as the stop.
Position size is what falls out of those two levels—never the input.
Both orders are placed before the entry fills, not after.
What a stop loss actually does
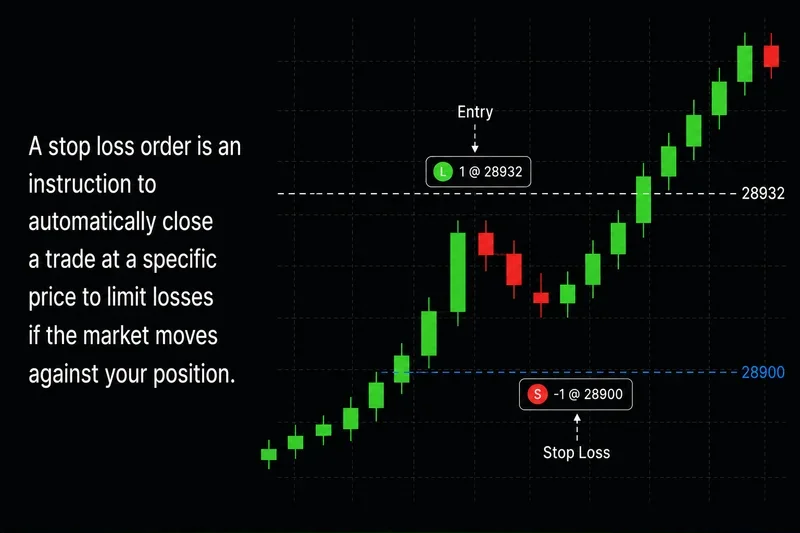
A stop loss is a resting order with the broker, attached to your position at a specific price. If the price trades through that level, the order converts into a market sell (for a long) or a market buy (for a short) and closes the position. You do not have to be at the screen. You do not have to argue with yourself in the moment.
The job of the stop is narrow. It defines invalidation. It says: if the price reaches here, the reason I took the trade is no longer valid, and the risk now exceeds what I agreed to lose. That last word matters—agreed. The size of the loss is something you accept before the entry, not something the market hands to you afterwards.
The correct stop level depends on the setup that justified the entry. A few common cases:
Long taken off a swing low—place the stop below the low, with a small buffer for noise, far enough that ordinary chop does not trigger it.
Breakout entry above a range high—place the stop back inside the range, below the level that was just broken.
Short against an extended move—place the stop past the recent extreme, where a continuation would invalidate the mean-reversion thesis.
Trade off a higher-timeframe level—place the stop on the far side of the level, sized for the wider distance with a smaller position.
A stop placed at a round dollar amount because that is what you can stomach is not a stop. It is a budget line dressed up as analysis. The level has to come from the chart first; position size adjusts to keep the dollar loss inside the budget.
What a take profit actually does
A take profit is the mirror image—a resting order at the level where the trade is finished, where the move you expected has played out, and the probability of further continuation has dropped enough that staying in is no longer worth the risk. When the price touches that level, the order fills and closes the position.
The take profit forces a question most beginners never answer: Where would I get out if this works? Without that answer, profitable trades turn into round trips. Price reaches the target, the trader feels strong, the target moves higher, price reverses, and the trade closes red. The setup was right. The management was not.
Good take-profit levels come from the same chart structure as the stop:
Prior swing highs and lows in the direction of the trade.
Range extremes when the entry came from inside the range.
Liquidity pools where the move was likely heading.
Measured-move projections from the pattern that triggered the entry.
Higher-timeframe levels that have already produced reactions.
The number is not arbitrary—it is a price the market has already shown it respects.
Stop loss vs take profit—the asymmetry that matters
Both orders close the position. That is where the similarity ends.
Aspect | Stop loss | Take profit |
|---|---|---|
Job | Limit downside on a wrong idea | Lock in upside on a right idea |
Decision driver | Where the structure breaks | Where the move likely ends |
Emotional pull | To widen or remove it | To move it closer for relief |
Should move | Rarely, only to reduce risk | Sometimes, with confirmed momentum |
Cost of skipping it | Account-ending | Winners turn into losers |
A missed stop can end the account in one trade. A missed take profit costs an opportunity. They are not symmetric mistakes. Protecting capital is the first objective; capturing every dollar of a move is a distant second.
How to set stop loss and take profit on a real chart
The order of operations matters. Pick invalidation first. Pick the target second. Position size is what comes out of those two numbers, not what goes into them.
Identify the structure that creates the setup—a swing low, a breakout level, or a clear range edge.
Place the stop on the far side of that structure with a small buffer for noise.
Place the take profit at the next structural reference in the direction of the trade.
Measure the entry-to-stop distance in points or dollars. That is your risk per unit.
Divide the dollar amount you are willing to lose by the risk per unit. That is your position size.
Check the risk-to-reward ratio. At least 1:1.5 for most setups, 1:2 or better preferred.
If the ratio is below 1:1.5, pass on the trade. The math does not survive a normal win rate.
This sequence kills the most common beginner mistake—sizing first, then squeezing the stop to fit the dollar number. That works backward from comfort, and the stop ends up inside the noise.
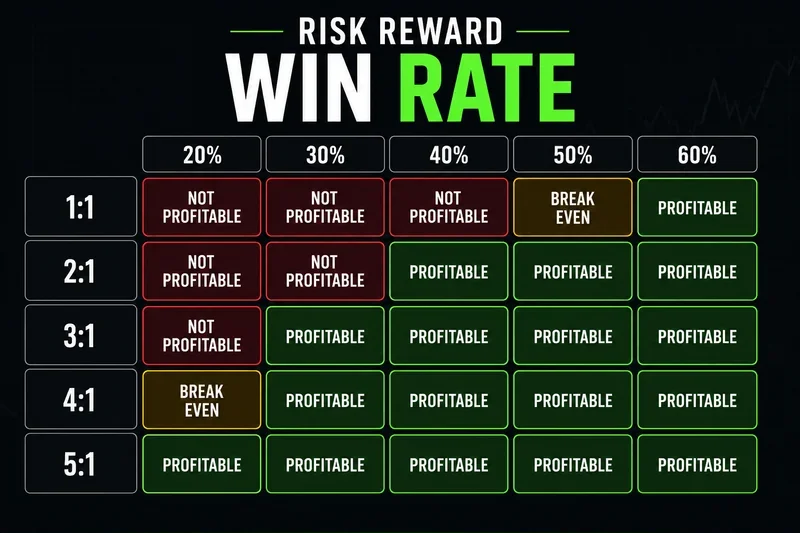
The relationship between risk-to-reward and the win rate a strategy needs to break even is one of the most useful tables a beginner can keep in front of them.
Risk-to-reward | Break-even win rate | Practical read |
|---|---|---|
1:0.5 | 67% | Needs an unrealistic hit rate; usually scratched setups |
1:1 | 50% | Survives only with above-average accuracy |
1:1.5 | 40% | Workable for most discretionary strategies |
1:2 | 33% | Standard professional target |
1:3 | 25% | Trend-following and runner setups |
If the structural stop and the structural target produce a ratio below 1:1.5, the answer is to pass on the trade, not to move the target closer.
Order types that combine both bracket and OCO orders
Most retail platforms let you submit a stop loss and a take profit as a single attached order. The names vary; the behavior is the same.
Bracket order—entry, stop, and take profit submitted together. When the entry fills, both exits go live. When either exit fills, the other cancels.
OCO (one-cancels-other)—two linked resting orders; a fill on one cancels the other. Bracket orders use OCO logic on the exits.
Trailing stop—follows price by a fixed distance or percentage as the trade moves in your favor. Locks in profit without manual intervention; tends to get clipped if the trail is too tight.
Stop-limit—converts to a limit order rather than a market order. Gives price protection at the cost of not filling at all if price gaps through.
Guaranteed stop—offered by some brokers for a premium; honored at the exact price, even on gaps. Useful for overnight equity positions or events.
For beginners, the bracket order is the right default. It removes the temptation to manage exits manually and forces both exits to be defined before the entry fills.
When to move a stop to break-even—and when not to
Moving the stop loss to the entry price (the break-even point) is the most popular trade-management move in beginner content. It sounds free—once moved, the worst case is a scratch instead of a loss. It is not free. Every time you move a stop closer, you raise the probability that ordinary noise will close the trade before the thesis has played out.
The rule that holds up across most strategies: only move the stop to break-even when the trade has reached a structural milestone that justifies it. Price has broken the next swing in the direction of the trade and held there. Or the price has reached the first take-profit reference, and a partial has been booked. Moving the stop because it has been twenty minutes and you are nervous is not a trade-management decision. It is an emotional one, wearing technical clothing.
When stop loss and take profit fail you
This is the part most beginner guides skip. Stops are not magic. The order will not always protect you the way the textbook promises.
On a gap—overnight in equities, weekend in crypto, around major data releases in futures—a stop loss converts to a market order at whatever price is available, not at your stop price. The stop did its job; the market did not give it the price it asked for. Guaranteed stops exist for this reason; they cost money for a reason.
During a fast move, slippage between the stop price and the fill can be wide. NQ in the overnight session is a common example. The same level that holds cleanly during cash hours can blow through with multi-point slippage at three in the morning on thin liquidity. Take profits fail in the opposite way—a target sitting one tick beyond a liquidity pool often never fills, because the move that reaches the pool exhausts itself there.
The practical implication: position size has to account for the worst-case fill, not the planned one. A trade that requires the stop to fill exactly is a trade that is too big.
Failure mode | Typical condition | What it costs |
|---|---|---|
Gap through the stop | Overnight news, weekend, earnings | Fill far below the stop price |
Slippage on a fast move | Thin overnight session, headline shock | Multi-tick gap between stop and fill |
Take profit never fills | Target sits one tick past a liquidity pool | Closed winner becomes a round trip. |
Trailing stop clipped | Tight trail in choppy conditions | Exit before the move continues |
Stop-limit not filled | Limit too tight on a gap | Position still open after the move |
Common stop-loss mistakes beginners make
Setting it where it feels safe instead of where structure breaks. A stop two ticks below entry is set by the account balance, not the chart.
Moving it wider when it gets close. Converts a small loss into the account-ending one.
Removing it entirely to give the trade more room. No professional account survives the habit of disabling stops.
Using the same dollar stop regardless of volatility. A two-point stop on NQ during a quiet morning and during the CPI release are not the same trade.
Setting the stop at an obvious round number. Round numbers attract liquidity. Place the stop past them, not on them.
Treating the stop as the budget. Structure decides the stop level. Size decides the dollar loss.
Most blown accounts do not start with one catastrophic trade. They start with the habit of widening or removing stops during sessions that already went wrong.
How professional position sizing connects to stops
The stop loss is the input that makes position sizing possible. Without a defined stop, there is no risk per trade; without risk per trade, there is no rational way to decide how big to trade. Stop placement, position sizing, and risk-reward ratio belong to the same decision, not separate ones.
The sequence professional traders use is the inverse of the beginner habit:
Define the maximum dollar loss for the trade—typically a small fixed percentage of account equity.
Place the stop where the structure says it should go, with no reference to that dollar number yet.
Measure the entry-to-stop distance in points or dollars.
Divide the dollar loss by the per-unit risk to find the position size.
If the resulting size is uncomfortably small, the stop distance is wider than the setup deserves, or the account is too small for the volatility of the instrument—either way, the answer is not to move the stop.
A related habit separates accounts that survive from accounts that do not: tracking exit quality, not just entry quality. Every closed trade leaves data on whether the stop was hit because the idea was wrong or because the stop was poorly placed. A trading journal that tracks performance metrics makes that distinction visible over a sample size large enough to act on.
FAQs
What is a stop loss in trading? A stop loss is a resting order placed with the broker at a specific price. If the market trades through that price, the order converts to a market order and closes the position. Its job is to define the maximum loss before the trade opens.
What is take profit in trading? A take profit is a resting order at the level where the trader plans to close a winning position. When the price reaches it, the order fills and locks in the gain. It removes the exit decision from the moment the position is open, when judgment is least reliable.
How do I decide where to put my stop loss? Place it on the far side of the structural level that defines the trade—the swing low for a long, the swing high for a short, and the breakout level for a momentum entry—with a small buffer for noise. Position size then adjusts so the dollar distance to the stop equals your planned risk.
What is a trailing stop order? A trailing stop follows price by a fixed distance or percentage as the trade moves in your favor. It does not move backward, so it locks in profit progressively. It works well in trending conditions and tends to get clipped in choppy ones.
When should I move my stop to break-even? Only when the price has reached a structural milestone that justifies it—breaking the next swing in your direction or hitting the first profit target with a partial already booked. Moving the stop closer out of nerves raises the chance that normal noise closes the trade early.
What is a good risk-to-reward ratio for stop loss and take profit? Most setups need at least 1:1.5; 1:2 or better is preferable. The ratio determines what win rate the strategy needs to break even. A 1:2 setup is profitable at a 40 percent win rate; a 1:0.5 setup needs to win more than two-thirds of the time, which most discretionary strategies do not deliver consistently.
Worth the read?